Showing posts with label she's crafty. Show all posts

Tuesday, September 2, 2014

postcard travel journals

postcard albums
Almost four years ago, I wrote a blog post about my lifelong postcard collection. A few weeks afterwards, I organized my postcards into albums, but true to disorganized Rachel form, I failed to post an update as to how I ended up organizing my collection. Today, my friend Sarah asked what kind of albums I use for my postcards since she wants to create an album for her four year old daughter, Anna, who has a growing collection of postcards. So I was spurred to action and I grabbed my camera and took some photos of my current albums.

What I wanted to share today was how I document our travels. While I have a compulsion to document the shit out of everything (much to Larry's annoyance), I am not at all interested in scrapbooking and post-sixth grade, I've never successfully kept a journal for more than a few days. My blog is definitely my most successful means of documenting my life. I am obsessed with photography and have a hard drive with probably a hundred thousand photos on it. I have the best intentions of creating albums for all the vacations that Larry and I have taken together, but making photo books is a somewhat gargantuan task. (Someday...)
postcard albums
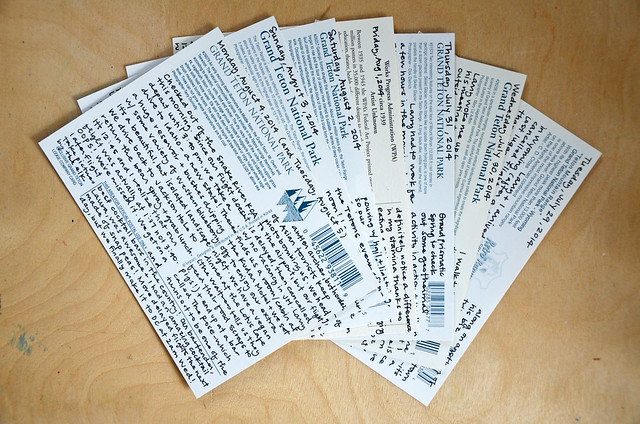
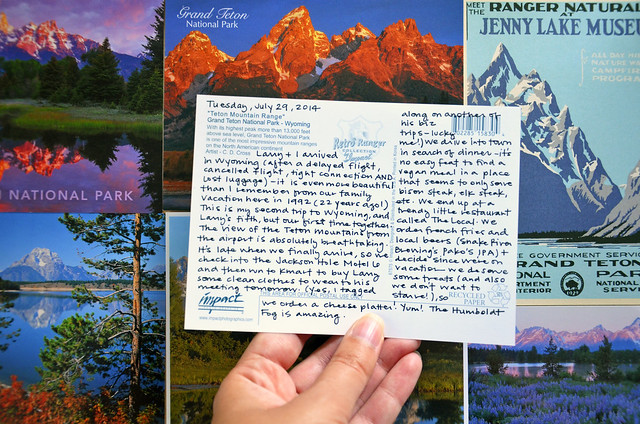
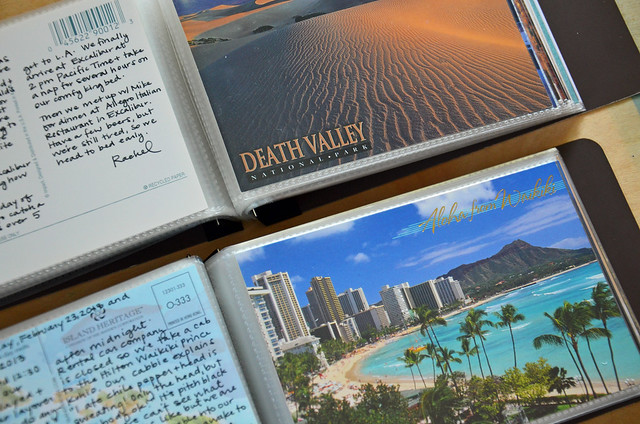
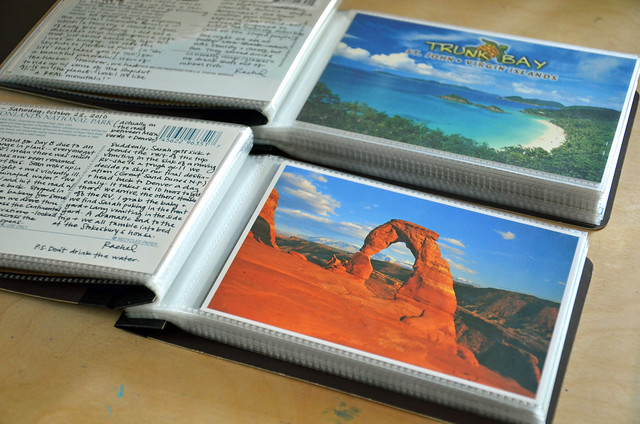
I have, however, been writing postcards about all our travels since Larry and I took our first vacation together in St. Thomas in 2004. I've written a daily postcard for every vacation Larry and I have taken over the past ten years and now have amassed several volumes of travel journals - all written on the backs of postcards and stored in simple 4x6 albums.
postcard albums
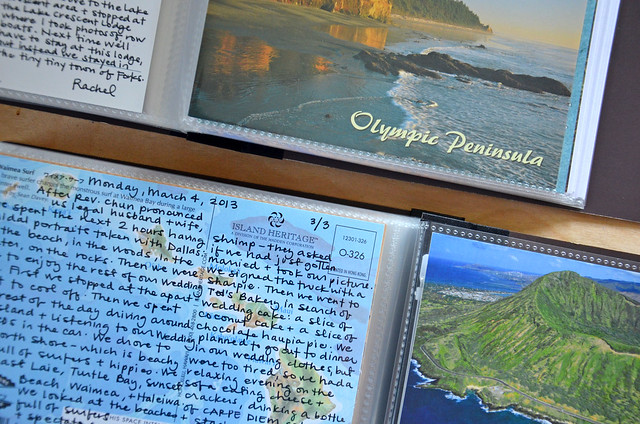
I love this method - it's simple and doesn't take much time as your journal entry is limited to what you can fit on the back of a postcard. (I don't actually mail the postcards, so I can write two columns of text on each one.) It helps to write each night while our day's adventures are still fresh in my mind - and that way, I've still documented our vacation even if I don't get around to blogging about it until months later.
postcard albums
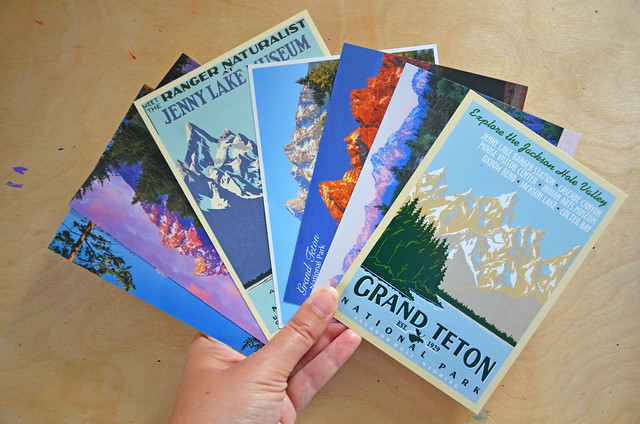
I have postcards from our adventures in national parks, road trips with friends, and our wedding in Hawaii. Here are the cards from our most recent trip to Wyoming a few weeks ago:
postcard albums
postcard albums
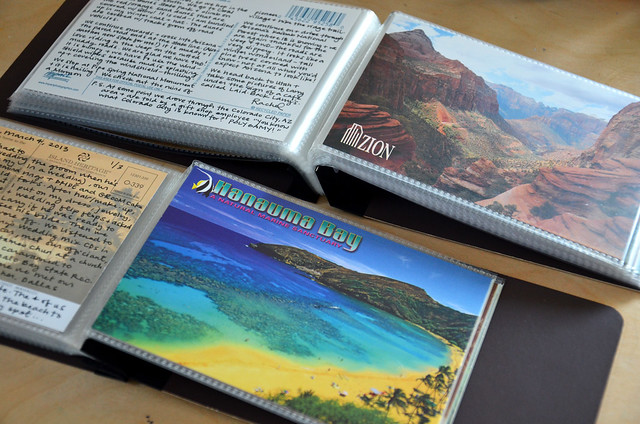
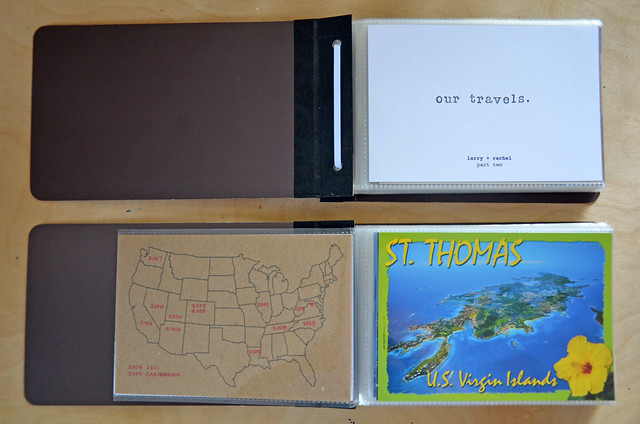
I created a simple title page for each book. The back of the title page is a map where I can write the dates we traveled to each location:
postcard albums
The goal here is to keep it simple or I'd never be able to keep up with this project. 4x6 postcards in 4x6 albums, done.
postcard albums
postcard albums
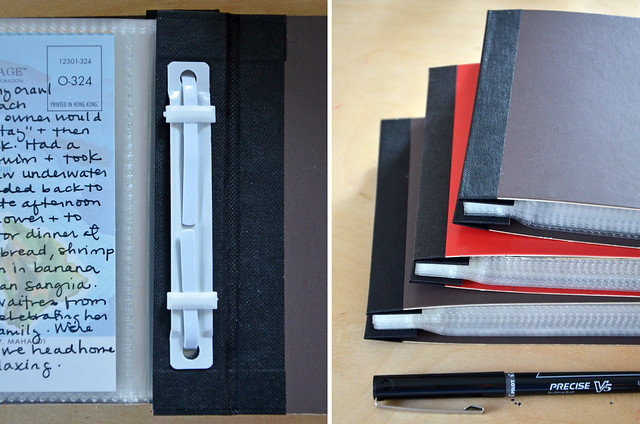
As for Sarah's question about the albums, I use 4x6 SEI Preservation Albums. I'm sure there are fancier albums out there (my choices were limited when I bought these four years ago), but I like these because unlike a lot of the mini albums that only hold 10-20 photos each, you can add extra plastic sleeves to these albums with SEI refills. (I have about 50 postcards per album.) These albums also allow the front and the back of the postcard to be visible and display only one postcard per page - both important criteria for making my album feel like a book and read like a page-a-day journal. They aren't fancy, but they do the trick and only cost a few bucks each at ShopSEI or Scrapbook.com.

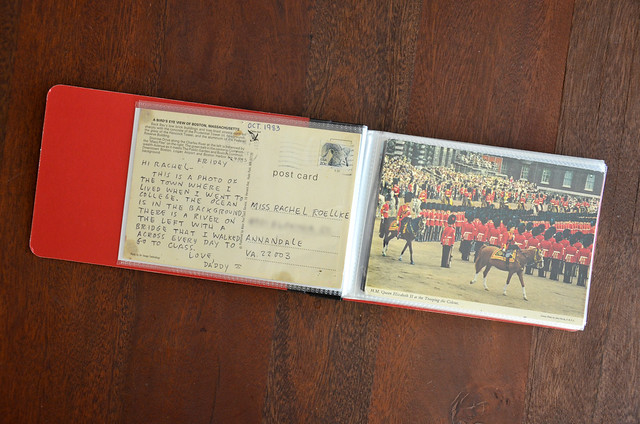
I used the same method for organizing the postcards I've been collecting since childhood, starting with the first postcard I got from my dad in 1983:
postcard album
Now I've got my postcard collection organized and a nice little stack of memories to flip though.

And I'll be sure to send little Anna some more postcards for her collection, just as friends and family did for me when I was little.

Wednesday, March 19, 2014

what I did during olympic break

projects | winter 2014
I've been quiet lately, but I had a really productive and creative Olympic Break. Basically, I converted my house into a sewing sweatshop and spent two weeks toiling over my sewing machine and rooting for Team USA. I'm really excited about these projects and many are worthy of their own blog posts, so I will photograph and share details soon, but for now, here's a sneak peek at what I accomplished over the past few weeks:

+ Sewed two quilt tops!
projects | winter 2014
This was my biggest accomplishment. Ever since I sewed my first quilt last summer, I've been obsessed with quilting, and snowy February was the perfect time to work on these projects. In true Rachel fashion, I started the second quilt without finishing the first one, but I hope to have these both quilted and bound soon.

+ Framed and hung artwork:
projects | winter 2014
Top two pieces are original mixed-media paintings by me. I hope to add abstract art to my shop this spring. Dog illustration by Kelly Puissegur/Retro Whale. Smiths poster by Wasted Rita.

+ Baked Ina Garten's favorite chocolate cake:
olympic break 2014

+ Experimented with stitched art:
projects | winter 2014

+ Read The Orphan Master's Son:
winter break
Great book, though I had dreams about being in a North Korean prison.

+ Designed and sewed pillows:
projects | winter 2014

+ Survived for a week on a can of refried beans, a dozen eggs, and a jar of salsa. Some delicious combinations: omelet-quesadilla, chili topped with a runny egg, omelet stuffed with chili, huevos rancheros.

+ Watched hours of Olympic coverage. My favorite event to watch is snowboard cross, but I love watching everything...except curling.

+ Had a recurring dream that I was using my sewing machine while on skis. Maybe this should be a new Olympic sport?

projects | winter 2014
I learned that it is important for me to schedule time to focus on personal projects. Productivity and creativity breed more productivity and creativity - I found that completing personal projects got me inspired to work on business projects, too. My Olympic Break was so awesome, satisfying, relaxing and productive, that I now plan to schedule break weeks every few months throughout the year - a time to unplug and make things and live.

Friday, November 22, 2013

DIY travel map

DIY travel map
I love travel, I love maps, and I love keeping track of things, so it's no surprise that I've wanted a travel map for years. (Plus, Larry and I have a goal to visit all 50 states, and we're a tiny bit competitive about it.) It's lame that it took me so long to actually follow through with this project, though, especially since I searched and searched for years for an acceptable map and finally bought one in 2011. Yes, I've had this map rolled up in a tube for TWO YEARS. It's finally on the wall, though!

I wanted a map that was simple and modern and found this one on Amazon. It was $1.68 when I bought it two years ago. It's 24x36 and printed on a metallic silver paper. The map does have a few geographic inaccuracies, though. (Where are the Great Lakes? What happened to Michigan???) I'm not sure if this is because it was a $2 map or because it was printed in the U.K. (Evidently, Americans aren't the only ones who suck at geography!)
DIY travel map
I had initially wanted to hang the map in a public area in our house, because I think it's a good conversation piece, however, there just weren't any good spots in our living or dining room, so I decided to hang it in our bedroom. This worked out for the better because the metallic paper shows every fingerprint (I wore cotton framer's gloves while framing), and I think our visitors would think it was pretty snotty if we had a "Please don't touch" sign next to it in our living room.
DIY travel map
I really wanted the map to look like a frame-worthy piece of art, so I mounted it to adhesive-backed foam core and framed it in a walnut frame (without glass, obviously). I've seen maps mounted to corkboard using pushpins, but this looks wrinkly and sloppy to me, so mounting the map to foam core was important in achieving a smooth and professional appearance. Plus, the foam core works as a backer board for the map pins.

Orange pins | Places I've traveled
Blue pins | Places Larry's traveled
White pins | Places we've traveled together

(For the sake of clarity, I'm only putting one pin per state/country regardless of how many cities we've been to. I would like to get a larger U.S. map someday to pin all the cities we've visited.)
DIY travel map
DIY travel map
The map was a good reminder of how big the world is and how little of it I've seen. I haven't done anywhere near as much traveling as I'd like - I didn't grow up in a military family (or in a family that traveled anywhere besides New Jersey, really) and I've never had a job that sent me to any interesting places for business, so all of my traveling was for pleasure or school (I studied abroad twice). Larry, on the other hand, has done a lot of business travel and has been to some very interesting places in Asia and Europe, as well as a good amount of domestic travel. Of course, the best trips have been the ones we've taken together. We've done some amazing traveling together in the good ol' USA as well as a couple trips to the Caribbean, but we definitely need to add some white pins to international locations!
DIY travel map
DIY travel map
And while I wish we could stick pins all over South America, Asia, Australia, and Africa (some day?), I do feel very lucky that I've gotten to experience a (tiny) bit of the world outside of the United States. To put it in perspective, I recently heard that over 50% of Americans have never been outside the U.S.
DIY travel map
It's a big big world! Let's go!

Wednesday, September 4, 2013

the clay possum

the clay possum
Half-assed miniature re-creation of The Clay Possum. 
(My marsupial-sculpting skills have gone waaaay down hill since 1987...)

Third Grade. Art class should've been my favorite, but to put it quite frankly, our elementary school art teacher was an asshole. (Childhood friends, you know exactly who I am talking about.) He publicly ridiculed everyone's work and regularly made students cry. During each class, he would pick one student, do their entire project for them, and then make fun of everyone else's projects for not being as good. I don't know why this guy was working with children. Dude was a jerk.

Fortunately, I have no recollection of the asshole art teacher in the story I'm about to tell. I just remember eight-year-old me toiling over a hunk of red clay. I'm not sure exactly what the assignment was - perhaps it was just "make something out of clay", but I do remember quite specifically that I wanted to make something for my mother. A Christmas present? Mother's Day? Her birthday? A just-because gift? I'm not sure, but I do know that I wanted to make my mom something and I wanted it to be awesome.

I decided to make a possum.

Yes, a possum. You know, the rat-like marsupial that eats garbage and carries rabies? Yes, that possum. Made out of clay. FOR MY MOTHER.

Not only that, I designed my clay possum to be a candleholder. I just knew that the clay possum candleholder would look fantastic on our fancy mahogany dining room table - the table that we only ate at for special occasions. Possums were special because they carried their babies in a pouch and could hang upside-down by their tails. So what could possibly say special occasion better than my mother's heirloom china, grandmother's silver, and a clay possum with a candle stuck in its back???

At school, we got our hunks of clay, and I set about sculpting mine into a life-like (and almost life-sized) version of my beloved local marsupial. (Ok, it wasn't life-sized - have you ever seen a possum? It's the size of a cat! But my possum was easily the size of a well-fed rat. After all, I wanted this sculpture to be a centerpiece. A real show-stopper. Go big or go home! And if I could've requested 14 pounds of clay to truly make the possum life-sized, I probably would have.) I crafted its pointy snout and beady eyes. I rolled out a snake for its pink hairless tail. I carefully used a carving tool to scratch the texture of its wiry coat into the clay. Last, but not least, I dug out a hole in the possum's back to hold a single elegant taper candle. I carved my initials into the bottom and I was done.

It was a masterpiece. The best thing I had ever made.

I couldn't wait to give it to my mom. She would be amazed at how realistic it was. She would give it a place of honor on the fancy mahogany dining table. I mean, it would almost be like dining with a real possum!

Before I could give the possum to my mom, however, we had to wait several weeks for our sculptures to be fired in the school's kiln. I waited and waited for our next art class. I couldn't wait to see my masterpiece transformed from pliable clay into a piece of art that would survive for eternity.

At long last, the sculptures had been kiln-fired and were ready to be returned to a classroom full of budding artists. The finished pieces were passed out to my classmates one by one. But where was my possum???

Terrible news: My possum had broken in the kiln.

Also broken was my heart.

There was nothing left of my masterpiece but shards and dust. The possum sculpture had completely exploded. (An appropriate end for a critter who so often ends up exploded all over the road, though I didn't see it that way when I was eight.)

In retrospect, I wonder if the teacher had called my mother and warned her that a flaming possum was about to be staring her in the face as she ate Christmas dinner: "Want me to smash it with a hammer?"

I'm just kidding. I have the type of mother who would've proudly displayed anything I had made as a child. I'm not sure that she's ever heard this story before, as I was too heartbroken and ashamed at the time to tell her that her gift was a failure. But Mom, that kiln saved you from years of fugly adorning the dining room table.

And that might have been the best gift of all.

Monday, August 26, 2013

DIY dog feeder

DIY dog feeder
Last September we were on a bit of a building kick. Simple projects, yes, but we built a tub shelf, a shoe shelf, and a dog feeder. Well, we never finished the dog feeder. We built it, and then it sat unpainted in our guest room for eleven months. I'd like to say it was because the day we built it, was the day a tree came crashing into our fence and we were distracted by the clean-up effort. But there's no excuse for taking almost a year to complete such an easy project.
DIY dog feeder
The real reason it took me so long is because I was frustrated. We constructed the feeder using hand-held power tools and a doweling jig, and the resulting craftsmanship was somewhat shoddy:
DIY dog feeder
When we couldn't get the dowels pounded in so that the adjacent parts were flush, Larry gave the whole thing a whack with a rubber mallet, and...it cracked. I had planned to leave the feeder as natural wood, coated with stain or poly, so it looked like an actual piece of furniture, but the imperfections in our construction ruined the whole thing for me. Waaahhh, call me a baby, but I'm a perfectionist and I'm definitely the "If it can't be perfect, I don't want it at all" type, which just might be my most annoying trait. It is the reason 9 out of 10 projects I start don't get finished. I'm trying to get over it.
DIY dog feeder
So, I scratched my plan to stain the feeder, and decided that painting it would be a good way to cover up the imperfections as well as seal up the cracks and exposed joints. (At first, I planned to fix the imperfections with wood putty, but on the day I started painting, I discovered our wood putty was dried up, so I just slapped primer and paint over the whole mess and it worked just fine.) But then I couldn't decide on a paint color. The dog feeder's permanent location will be in our mudroom/soon-to-be walk-in pantry (though that is a story for another day), so I could get away with using a fun, bright paint color. I finally decided that rather than buy a new can of paint, I would use paint that we already had, specifically, orange porch paint.

Yes, orange porch paint. At this point you're probably wondering "They weren't possibly thinking of painting their porch orange...were they?" Yes, yes we were (and I still hope to - there is a lot of orange porch paint left). We have a small balcony off of our upper level master bedroom and my plan three or four years ago was to paint the balcony floor orange and stencil it with a moorish trellis pattern. (Again, a story for another day.)
DIY dog feeder
"WHAT DO YOU MEAN, A DIET?!?!"

So, I had a gallon of three year old orange paint. I can't remember the exact name of the paint color, but it was something like Birds of Paradise. When I opened the can and stirred it up, I realized the paint was the actual color of melted cheese. Seriously, I could've staged the paint with some Tostitos or elbow macaroni and no one would've known the difference.
DIY dog feeder
Despite my misgivings towards painting with a can of queso, I plowed ahead and got it done. It's not perfect, but it still looks decent:
DIY dog feeder
(What doesn't look decent is the state of our lawn...)

And most importantly, it's functional! Banjo and Gravy can both eat comfortably now:
DIY dog feeder
NOM.

DIY dog feeder
NOM NOM NOM.

I'm happy with the finished product. Tell me again, why didn't I finish this project sooner?!
DIY dog feeder
DIY dog feeder
Also, it's a HUGE improvement over the "feeding station" we were using before, which was putting the dog bowls on an old Igloo cooler. The following photo may turn your stomach:
old feeding station, ewwww!
BEFORE. (Alternate caption: EWWWWWW!)

DIY dog feeder
AFTER.

The fact that our old system was unattractive was the least of our problems. The bowls would move around on top of the cooler and get knocked on the floor. There were bits of dog food everywhere. The grossest part was that brown smear on the wall at bowl height: dog food mixed with dog slobber. Ewwwww! And we kept the water bowl on the floor so that Banjo, our shorter dog, could reach it which led to sloshing and gross floor tiles. The whole set up was just nasty, and I'm glad to be rid of it in favor of our new custom-built cheese-colored dog feeder. It's more ergonomic for the dogs and cleaner and more attractive for me. And it's done!

DIY dog feeder
"Hey lady, how about you stop messing around with the camera and put some food in this dish?!"
(I love how it looks like he has a nose ring in this pic! Goes well with his tattoos!)


Another summer project (finally) complete!

Tuesday, August 20, 2013

I made a quilt!

nana quilt
I made a quilt, and I have to say, I'm pretty freaking proud of myself for finishing it.

I tried to make my first quilt when I was 12. I stitched the squares together by hand. I think I got eight squares together before I called it quits. One, it was taking forever, and two, I realized I wasn't really a quilt person. Back then, the only quilts I was familiar with were patchwork squares and floral, which seemed rather country and cutesy to me. My taste runs modern, so when I saw all the modern quilts that started popping up on the internet about five years ago, I fell in love with the idea of making a quilt again. It seemed like a daunting project, though...the type of thing that I knew I would never finish, especially since my list of successfully completed sewing projects includes two sofa pillows, an iPad case, some felt garlands, a blind hem on a pair of dress pants, and a pillow shaped like a pig that I made for my seventh grade Home Ec class (which was inexplicably called "Teen Living" back then. I don't know many teenagers for whom sewing pillows shaped like farm animals was either an important life skill or part of their recreational lifestyle in 1992, but whatever, it was an easy A).
nana quilt
nana quilt
Anyway, I'm saying my sewing skills were questionable. I mean, I know how to sew...a skill I attribute more to osmosis than anything I learned in seventh grade Teen Living. My mother sews. She made me clothes when I was a kid, she sewed curtains, she even made my prom dress. However, it always seemed that my mom sewed more out of necessity than as a hobby - an impression I got because I can still envision her sitting in front of her sewing machine and cursing as she ripped out seams. Her projects always turned out well, but the process seemed so frustrating to me, that I was never really interested in learning to sew for fun.
nana quilt
I bought myself a decent sewing machine about four years ago and realized Hey, this isn't so bad. It's actually kind of fun. And so much faster than sewing by hand! Still, sewing a quilt was ambitious. But it fit my long-standing criteria for attempting sewing projects: 1. That it doesn't have to be worn, and 2. That it only involves sewing straight lines. I gathered up some more inspiration from the talented people of the internet, specifically Ashley's beautiful modern quilts, and Elise's can-do attitude and beginner's enthusiasm and decided that yes, I could sew a quilt.
nana quilt
nana quilt
My plan was to make a modern half-square triangle quilt with solid colors, but then the idea of a blue and green patterned quilt popped into my head. These were my Nana's favorite colors - I think everything she wore was blue, green, or blue and green - and I still think of her every time I see those colors together. I knew then and there that I would make a Nana-inspired quilt, and bought a stack of blue and green fabrics to store away for my future project. (Honestly, I think that was four years ago.)
nana quilt
Now that I think about it, making a quilt in honor of my grandmother is kind of hilarious, considering that she was not at all the domestic type. She loved crossword puzzles, murder mysteries, and eating ice cream in bed with her cats, but she used her oven for storage and I never ever saw her sew. In fact, my mother spent most of her time in front of the sewing machine hemming my grandmother's pants, so I'm guessing that Nana didn't even know how to sew.
nana quilt
Anyway, I finally decided to tackle the blue and green quilt this summer and my goals for the project were GET HER DONE and EMBRACE IMPERFECTION. That was totally the way to go. I cut the squares and sewed the quilt top throughout a couple weeks in June. I took July off to prepare for art markets. And I put the whole thing together, basted, quilted, and attached the binding during the first week of August. Done!
nana quilt
nana quilt
nana quilt
nana quilt
It's not even close to perfect, but it's handmade and the crooked seams, misaligned squares, and wonky binding are part of its character. Would an experienced quilter be appalled with my make-it-up-as-I-go "techniques"? Absolutely. But the quilt is done. And I knew that if I fussed with making sure everything lined up perfectly, I would get frustrated and never finish, and so if I messed up, I went with it. I learned a lot, I made mistakes, I powered through, and I finished it. (And I only cussed once - when I had major thread tension problems during the quilting stage and sewing with the walking foot led to a jumbled knot of thread and a flashing ERROR on my sewing machine. I eventually went back to quilting with the regular foot.)
nana quilt
Ironic, that yes, I did end up making a square patchwork quilt after thinking that they weren't my style, but I have to admit that I love the finished product. And it totally reminds me of my Nana - the day I finished sewing it, I snuggled up underneath it and thought about her and it was just so comforting. (If only I had a bowl of ice cream, a couple cats, and Murder, She Wrote on the television!)
nana quilt
At 67"x88" it's smaller than a bed quilt (though it would work on a twin bed) but way too big for a sofa throw. My original plan was to use this as a picnic blanket, but I'm not sure I can bear to put it on the ground! (I eventually got over that. My Nana was a nature-lover and set insects free outside instead of squashing them, so it seems only right that the quilt be used outside.)
nana quilt
Who knew that sewing could be so enjoyable and satisfying? (WHO HAVE I BECOME??? Certainly, the Rachel from seventh grade Teen Living is rolling her eyes, but back then I didn't know the joys of sewing and drinking beer at the same time!) I'm addicted to quilting now. I have plans and fabric stashes for three more quilts, but I'm forcing myself to wait for cooler weather to work on them. The weather is still nice now, and it's beckoning me to lounge, read, and picnic on my new quilt...
nana quilt